flowchart LR
    Start([Start]) --> Parse[Parse Args]
    Parse --> CheckMode{Full<br/>Mode?}

    CheckMode -->|Yes| FullMode[Include<br/>Hidden Files/Directories]
    CheckMode -->|No| NormalMode[Exclude<br/>Hidden Files/Directories]

    FullMode --> CheckArgs{Args?}
    NormalMode --> CheckArgs

    CheckArgs -->|None| ListAll[List All Files]
    CheckArgs -->|--filename| SearchName[Search<br/>Names]
    CheckArgs -->|--filecontents| SearchContent[Search<br/>Content]
    CheckArgs -->|Both| SearchBoth[Search<br/>Both]

    ListAll --> Display[Table<br/>Display]
    SearchName --> Display
    SearchContent --> ShowContent{Show<br/>Contents?}
    SearchBoth --> ShowContent

    ShowContent -->|Yes| Syntax[Syntax<br/>Highlight]
    ShowContent -->|No| Display
    Syntax --> DisplayPanel[Colored<br/>Panel]

    DisplayPanel --> Done([Done ✓])
    Display --> Done

    classDef startEnd fill:#27AE60,stroke:#229954,stroke-width:4px,color:#fff
    classDef decision fill:#3498DB,stroke:#2874A6,stroke-width:4px,color:#fff
    classDef process fill:#9B59B6,stroke:#7D3C98,stroke-width:4px,color:#fff
    classDef search fill:#E67E22,stroke:#CA6F1E,stroke-width:4px,color:#fff
    classDef output fill:#E74C3C,stroke:#C0392B,stroke-width:4px,color:#fff

    class Start,Done startEnd
    class CheckMode,CheckArgs,ShowContent decision
    class Parse,FullMode,NormalMode,Syntax process
    class ListAll,SearchName,SearchContent,SearchBoth search
    class Display,DisplayPanel output
Building a File Search Application
The Steps for Creating a Colorized File Search Tool with Python
Oliver Bonham-Carter
What Makes a Project Successful?! 🎉

Know the Steps: When you are developing a programming project to be shared online, there are steps to follow that will help the community understand, adopt and use your project effectively. 📝
On For Today 🚀
Building Real-World Python Applications
In this series, we’ll build complete, practical projects!
- 📦 Project Setup — Using modern Python tools (uv)
- 🎨 Beautiful Output — Rich library for colorization
- 🔍 File Operations — Working with files and directories
- 🎯 Command-Line Tools — argparse for user interaction
- 🧪 Testing — Validating your code works correctly
- 🔒 Hidden File Filtering — Smart directory traversal

Today’s Goal: Build a file search tool to locate information across files! 🔍
Traversing File Systems!
Why File Searching?
Common Use Cases:
- Finding specific files in large projects
- Searching for code snippets or configuration settings
- Auditing codebases for security issues or TODO comments
And Find Files and Content They Contain!
With This Solution?
Our FileSearch Tool:
- Search by filename, type or file contents
- Colorized, readable output
- Filters hidden files by default
This Band Is The Only Thing Cooler Than This Project!

📋 Anyways. Back to What We’re Building…
FileSearch — A Powerful File Search Utility
A command-line tool that helps you:
- 🔍 Search by filename — Find files matching a pattern
- 📄 Search by content — Find files containing specific text
- 🎨 Colorized output — Beautiful, readable results
- 🔒 Smart filtering — Exclude hidden directories by default
- 🌈 Syntax highlighting — View code files with colors
- ⚡ Fast & flexible — Search anywhere, customize everything
Important
Real-World Use Cases:
- Find all Python files that import a specific module
- Locate configuration files across multiple projects
- Search for TODO comments in your codebase
- Find files by extension or naming patterns
🛠️ Part 1: Project Setup with UV
(You already know the drill, but I’ll do it again for practice!) ¯\(ツ)/¯
What is UV?
UV is a modern, fast Python package manager created by Astral.
Why use UV instead of pip?
- ⚡ 10-100x faster than pip
- 🔒 Automatic lock files for reproducible installs
- 📦 Built-in virtual environment management
- 🎯 Simple commands — one tool for everything
Why Cover These Steps? You want to test each of these steps on your own machine to help you remember what commands to include in your README.md file when you share your project! 📝
Installing UV
Keep these commands handy for setting up UV on your system! It’s a game-changer for Python development. 🚀
Verify UV Installation

Creating Your Project
Step 1: Create the Project Structure
Commands (all operating systems):
Note
What just happened?
- UV created a new Python project with all necessary configuration
- A virtual environment is managed automatically
- You’re ready to start coding! 🎉
Project Structure Overview
Step 2: Organize Your Code
Best Practice:
- Keep your source code in a
src/directory to separate it from configuration files and documentation! 📁 - Mention the files of the project in the
README.mdto provide clear instructions for users and collaborators! 📝
Adding Dependencies
Step 3: Install the Rich Library
Different projects require different libraries. For this project, we’ll use Rich to provide beautiful terminal formatting and colors.
Install it:
🎯 Part 2: Understanding the Problem
What Problems Are We Solving?
Common Developer Needs:
- Find files by name — “Where did I put that config file?”
- Search file contents — “Which files use this function?”
- Readable output — “I can’t read this plain text mess!”
- Filter noise — “Too many .git and node_modules results!”
- View code nicely — “I need syntax highlighting!”
Our Solution: A Python tool that addresses all these problems with a clean, user-friendly interface! 🎨
Program Features Overview
Core Functionality
Input (Command-line arguments):
--filename: Search term for filenames--filecontents: Search term for file contents--path: Directory to search in--full-search: Include hidden files/directories
Processing:
- Recursively traverse directories
- Filter hidden files by default
- Search filenames and/or contents
- Detect file types for syntax highlighting
Output:
- Colorized tables for file lists
- Syntax-highlighted code display
- Panels and borders for organization
- Status messages and count summaries
🔄 Part 3: Program Flow
High-Level Algorithm
The program follows these steps:
- Parse command-line arguments → Get user’s search criteria
- Determine search mode → Full search or skip hidden files
- Execute searches → Find matching files
- Format results → Create beautiful output
- Display content → Show file contents if requested
- Report completion → Summary of findings
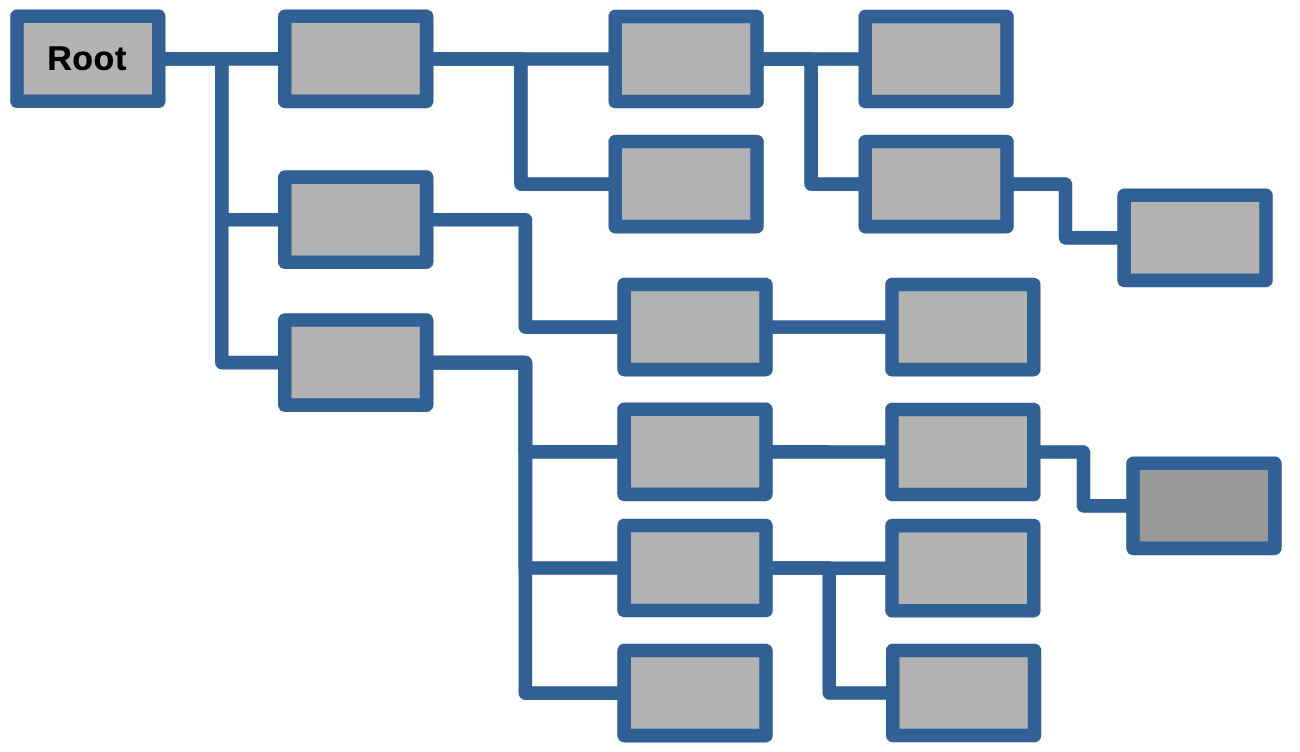
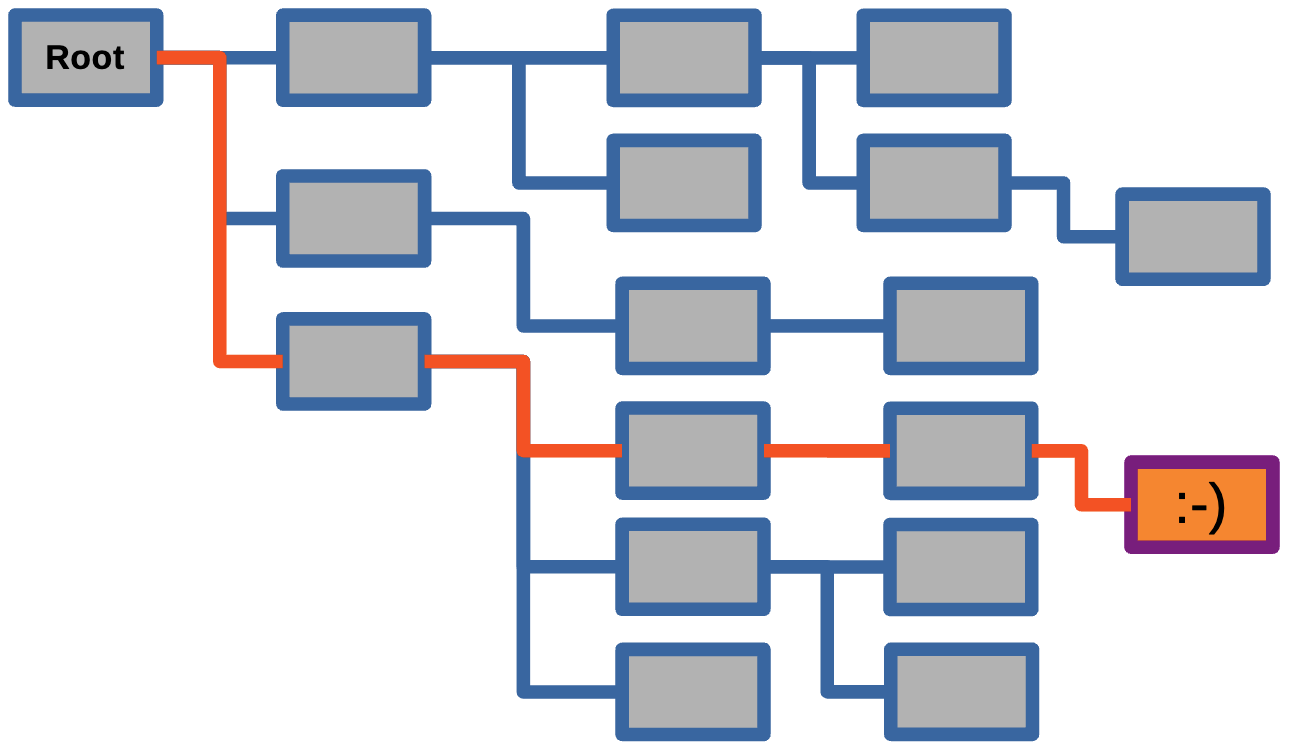
Flowchart — Program Logic
Too Complicated? Typical flowcarts look very complicated however, these “flows” represent the program logic in a visual way, making code inputs and outputs easier to understand. The edge cases and limitations of the code are also easier to spot. 🎨
Flowchart Explanation
Understanding the Program Flow
Decision Points:
- Search Mode — User can enable full search to include hidden files/directories
- Argument Selection — Program behavior changes based on which flags are provided
- Content Display — File contents are shown with syntax highlighting when searching by content
Key Processes:
- File Discovery — Recursive directory traversal with optional filtering
- Pattern Matching — Check filenames or file contents for search terms
- Output Formatting — Rich library creates tables, panels, and syntax highlighting
💻 Part 4: Building the Code
Code Structure Overview
We’ll build the program in these sections:
- Imports and Setup — Load required libraries
- Helper Functions — Utility functions for filtering
- Search Functions — Core search logic
- Display Functions — Output formatting
- Main Function — Command-line interface and orchestration

Step 1: Imports and Setup
What’s happening:
pathlib.Path— Modern, object-oriented file path handlingargparse— Parse command-line argumentsrich.*— Various Rich components for beautiful outputconsole— Single console instance used throughout the program
Step 2: Helper Function — Hidden File Detection
Add this helper function:
def is_hidden(path):
    """Check if any part of the path is hidden (starts with .)

    Args:
        path: A Path object representing a file or directory

    Returns:
        bool: True if any part of the path starts with a dot
    """
    return any(part.startswith('.') and part not in ['.', '..']
               for part in path.parts)
# End of is_hidden()
Note
Function Purpose:
- Checks if a file or directory is “hidden” (starts with
.) - Excludes
.and..(current and parent directory markers) - Returns
Trueif ANY part of the path is hidden - Example:
.git/configreturnsTruebecause of.git
Step 3: Get Path Function
Add the first search function:
def getPath(myFileType="*", full_search=False):
    """Get all files in the current directory and subdirectories.

    Args:
        myFileType: File pattern to match (default: all files)
        full_search: If True, include hidden files/directories

    Returns:
        list: List of Path objects for matching files
    """
    # Create a Path object for the directory
    base_path = Path('./')

    if full_search:
        myFiles = [p for p in base_path.rglob(myFileType)
                   if p.is_file()]
    else:
        myFiles = [p for p in base_path.rglob(myFileType)
                   if p.is_file() and not is_hidden(p)]

    return myFiles
# End of getPath()
Understanding getPath()
Code Breakdown
Key Concepts:
.rglob("*")— Recursively search for all files and directoriesp.is_file()— Filter to only include files (not directories)- Conditional filtering based on
full_searchparameter - List comprehension for efficient filtering
Example Usage:
Step 4: Search Filenames Function
Add filename search capability:
def searchFilenames(myPath, searchTerm, full_search=False):
    """Search for files with searchTerm in their filename.

    Args:
        myPath: Directory path to search in
        searchTerm: String to search for in filenames
        full_search: If True, include hidden files/directories

    Returns:
        list: List of Path objects for matching files
    """
    # Create a Path object for the directory
    base_path = Path(myPath)

    if full_search:
        myFiles = [p for p in base_path.rglob("*")
                   if p.is_file() and searchTerm in p.name]
    else:
        myFiles = [p for p in base_path.rglob("*")
                   if p.is_file()
                   and searchTerm in p.name
                   and not is_hidden(p)]

    return myFiles
# End of searchFilenames()
Step 5: Search File Contents Function
Add content search capability:
def searchFileContents(myPath, searchTerm, myFileType="*",
                      full_search=False):
    """Search for files containing searchTerm in their contents.

    Args:
        myPath: Directory path to search in
        searchTerm: String to search for in file contents
        myFileType: File pattern to match (default: all files)
        full_search: If True, include hidden files/directories

    Returns:
        list: List of Path objects for matching files
    """
    # Create a Path object for the directory
    base_path = Path(myPath)

    myFiles = []
    for p in base_path.rglob(myFileType):
        if p.is_file():
            # Skip hidden files/directories unless full_search is enabled
            if not full_search and is_hidden(p):
                continue
            try:
                with p.open() as f:
                    if searchTerm in f.read():
                        myFiles.append(p)
            except Exception as e:
                console.print(f"[yellow]Warning: Error reading file {p}: {e}[/yellow]")

    return myFiles
# End of searchFileContents()
Understanding Content Search
Code Breakdown
Key Features:
- File Iteration — Loop through all files matching the pattern
- Hidden File Filtering — Skip hidden files unless
full_search=True - Safe File Reading — Try/except block catches read errors
- Content Matching — Simple substring search in file contents
- Error Handling — Warn user about unreadable files (permissions, binary files, etc.)
Why Try/Except?
- Some files can’t be read (permissions, binary files)
- Prevents program crash on a single bad file
- Provides user feedback via warning message
Step 6: Display File Contents Function
Add syntax-highlighted display:
def printFileContents(filePath):
    """Display file contents with syntax highlighting.

    Args:
        filePath: Path object or string path to the file
    """
    try:
        with open(filePath) as f:
            content = f.read()
            # Try to detect file type for syntax highlighting
            suffix = filePath.suffix.lstrip('.')

            # List of supported languages for syntax highlighting
            if suffix in ['py', 'js', 'java', 'cpp', 'c', 'rs', 'go',
                         'rb', 'php', 'html', 'css', 'json', 'xml',
                         'yaml', 'yml', 'toml', 'md', 'sh', 'bash']:
                syntax = Syntax(content, suffix, theme="monokai",
                              line_numbers=True)
                console.print(Panel(syntax, title=f"[cyan]{filePath}[/cyan]",
                                  border_style="blue"))
            else:
                console.print(Panel(content, title=f"[cyan]{filePath}[/cyan]",
                                  border_style="blue"))
    except Exception as e:
        console.print(f"[red]Error reading file {filePath}: {e}[/red]")
# End of printFileContents()
Understanding Syntax Highlighting
How Rich Syntax Works
Features:
- File Extension Detection —
.suffixgets the file extension - Conditional Highlighting — Only apply syntax to known code file types
- Monokai Theme — Professional dark theme for code
- Line Numbers — Easy reference for code discussion
- Panel Display — Beautiful border and title
Supported Languages:
Python, JavaScript, Java, C/C++, Rust, Go, Ruby, PHP, HTML, CSS, JSON, XML, YAML, TOML, Markdown, Shell scripts
Fallback: Plain text display for unknown file types
Sample Output
Note
We outline the contents of a file with syntax highlighting and line numbers, making it easy to read and understand the structure of the code or text.
Step 7: Main Function — Part 1 (Argument Parser)
Set up command-line interface:
def main():
    # Set up command-line argument parser
    parser = argparse.ArgumentParser(
        description='Search for files by filename or file contents',
        formatter_class=argparse.RawDescriptionHelpFormatter,
        epilog='''
Examples:
  python main.py --filename test
  python main.py --filecontents "import sys"
  python main.py --filename test --filecontents python
        '''
    )

    parser.add_argument(
        '--filename',
        type=str,
        help='Search term to find in filenames'
    )

    parser.add_argument(
        '--filecontents',
        type=str,
        help='Search term to find in file contents'
    )
Maybe this function is too long? Typically, the functions of a program should be concise and focused on a single task. Consider breaking this function into smaller helper functions for readability and maintainability. In this case, the function is to create a prototype of the main functionality. Later, you can refactor it into smaller, more manageable functions. 📝
Step 7: Main Function — Part 2 (More Arguments)
Continue adding arguments:
    parser.add_argument(
        '--path',
        type=str,
        default='./',
        help='Base path to search (default: current directory)'
    )

    parser.add_argument(
        '--full-search',
        action='store_true',
        help='Include hidden files and directories (those starting with .)'
    )

    args = parser.parse_args()

    # Display search mode
    if args.full_search:
        console.print("[bold yellow]Search mode: FULL (including hidden files/directories)[/bold yellow]\n")
    else:
        console.print("[bold green]Search mode: NORMAL (excluding hidden files/directories)[/bold green]")
        console.print("[dim]Tip: Use --full-search to include hidden files and directories[/dim]\n")
Step 7: Main Function — Part 3 (List All Files)
Handle no arguments (list all files):
    # If no arguments provided, show all files
    if not args.filename and not args.filecontents:
        myFiles = getPath(full_search=args.full_search)
        console.print(Panel("[bold cyan]All files in the current directory and subdirectories[/bold cyan]",
                          border_style="cyan"))

        if myFiles:
            table = Table(show_header=True, header_style="bold magenta")
            table.add_column("#", style="dim", width=6)
            table.add_column("File Path", style="cyan")

            for idx, file_path in enumerate(myFiles, 1):
                table.add_row(str(idx), str(file_path))

            console.print(table)
            console.print(f"\n[bold green]Total: {len(myFiles)} files found[/bold green]")
        else:
            console.print("[yellow]No files found.[/yellow]")

        console.print("\n[dim]Tip: Use --filename or --filecontents to search for specific files[/dim]")
        console.print("[dim]Run with --help for more information[/dim]")
Step 7: Main Function — Part 4 (Search by Filename)
Handle filename search:
    # Search by filename if provided
    if args.filename:
        myFiles = searchFilenames(args.path, args.filename,
                                 full_search=args.full_search)
        console.print(Panel(f"[bold cyan]Files containing '{args.filename}' in their name[/bold cyan]",
                          border_style="cyan"))

        if myFiles:
            table = Table(show_header=True, header_style="bold magenta")
            table.add_column("#", style="dim", width=6)
            table.add_column("File Path", style="green")

            for idx, file_path in enumerate(myFiles, 1):
                table.add_row(str(idx), str(file_path))

            console.print(table)
            console.print(f"\n[bold green]Total: {len(myFiles)} files found[/bold green]")
        else:
            console.print("[yellow]No files found.[/yellow]")
Step 7: Main Function — Part 5 (Search by Content)
Handle content search:
    # Search by file contents if provided
    if args.filecontents:
        myFiles = searchFileContents(args.path, args.filecontents,
                                    full_search=args.full_search)
        console.print(Panel(f"[bold cyan]Files containing '{args.filecontents}' in their contents[/bold cyan]",
                          border_style="cyan"))

        if myFiles:
            console.print(f"[bold green]Found {len(myFiles)} file(s)[/bold green]\n")
            for idx, file_path in enumerate(myFiles, 1):
                console.print(f"[bold yellow]{idx}. {file_path}[/bold yellow]")
                printFileContents(file_path)
                console.print()  # Add spacing between files
        else:
            console.print("[yellow]No files found.[/yellow]")

    console.print("[bold green]✓ Done.[/bold green]")

# End of main()
Step 7: Main Function — Part 6 (Entry Point)
Note
Why if __name__ == "__main__":?
- This block only runs when the file is executed directly
- If someone imports your module, it won’t automatically run
- Standard Python best practice for executable scripts
- Allows the code to be both a script and an importable module
🎉 Code Complete!
Congratulations! You’ve Built the Entire Program!
Your src/main.py now contains:
✅ Import statements and setup
✅ Helper function for hidden file detection
✅ Three search functions (all files, by name, by content)
✅ Display function with syntax highlighting
✅ Main function with full command-line interface
✅ Entry point for program execution
Total Lines: ~190 lines of well-documented, professional Python code!

🧪 Part 5: Testing Your Program
Manual Testing — Basic Commands
Test 1: List all files
Expected: Table showing all non-hidden files in current directory
Test 2: Search by filename
Expected: Finds main.py and displays in table
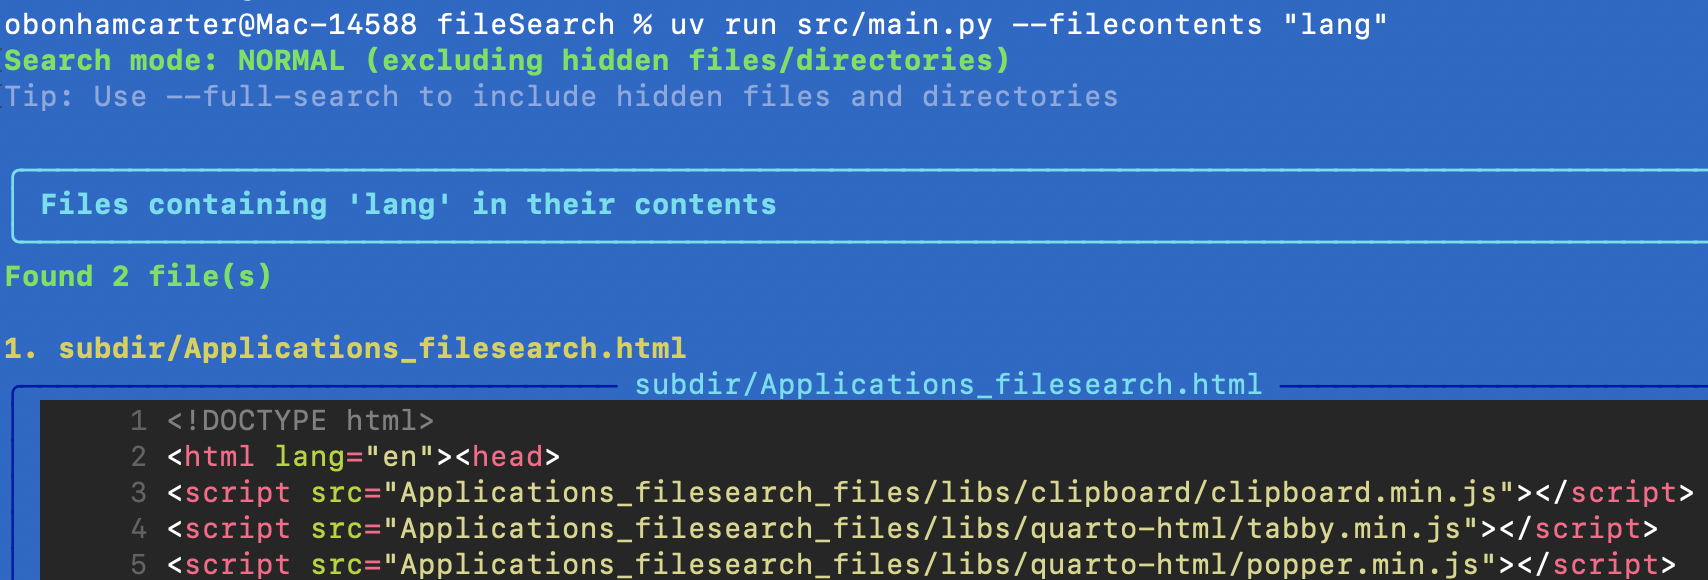
Test 3: Search by content
Expected: Finds files with “import” and shows syntax-highlighted contents
More Test Cases
Advanced Testing
Test 4: Full search mode
Expected: Finds pyproject.toml (even if in hidden directory)
Test 5: Combined search
Expected: Finds Python files containing function definitions
Test 6: Custom path
Expected: Only searches in src/ directory
Test 7: Help message
Expected: Shows all available options
Creating Test Files
Set Up a Test Environment
Create test files to verify functionality:
# Create a test directory
mkdir test_data
cd test_data

# Create some test files
echo "def hello(): print('Hello')" > test1.py
echo "import os" > test2.py
echo "# This is a comment" > test3.py
echo "Configuration data" > config.txt
mkdir .hidden
echo "Secret file" > .hidden/secret.txt

# Go back to project root
cd ..
Add Files Another Way: Just edit text files using your editor and store them in the test_data/ directory. 🎨
Using the Test Environment
Verify your program works correctly with these test files!
# Should find 3 Python files
python src/main.py --path ./test_data --filename py

# Should find files with 'import'
python src/main.py --path ./test_data --filecontents "import"

# Should NOT find .hidden files (normal mode)
python src/main.py --path ./test_data --filename secret

# SHOULD find .hidden files (full search mode)
python src/main.py --path ./test_data --filename secret --full-search
Automated Testing with pytest (Part 1)
Optional: Unit Tests
Install pytest:
Create tests/test_main.py:
import pytest
from pathlib import Path
import sys
sys.path.insert(0, str(Path(__file__).parent.parent / "src"))

from main import is_hidden, getPath, searchFilenames

def test_is_hidden():
    """Test hidden file detection"""
    assert is_hidden(Path(".git/config")) == True
    assert is_hidden(Path("src/main.py")) == False
    assert is_hidden(Path(".gitignore")) == True
    assert is_hidden(Path("README.md")) == False
# End of test_is_hidden()
Automated Testing with pytest (Part 2)
Automated Testing with pytest (Part 3)
Running Automated Tests With Pytest
Expected output:
======================== test session starts =========================
collected 3 items

tests/test_main.py::test_is_hidden PASSED                     [ 33%]
tests/test_main.py::test_getPath PASSED                       [ 66%]
tests/test_main.py::test_searchFilenames PASSED               [100%]

========================= 3 passed in 0.12s ==========================
Verification: Testing Checklist (Part 1)
What kind of tests should you run to verify your program works correctly? Use this checklist to make sure you’ve covered all the important cases!
✅ Basic Functionality:
✅ Edge Cases:
Verification: Testing Checklist (Part 2)
✅ Output Quality:
🚀 Part 6: Using Your Tool
Real-World Usage Examples
Find all Python files with a specific import:
Locate all configuration files:
Search for TODO comments across your project:
Find all markdown documentation:
Audit for security issues:
Extending the Project (Part 1)
Ideas for Enhancement
Beginner:
- Add case-insensitive search option (
--ignore-case) - Count total matches and display statistics
- Save results to a file (
--output results.txt) - Add file size information to the table
Intermediate:
- Regular expression support for advanced patterns
- Exclude certain file types (
--exclude "*.log") - Search within specific date ranges
- Export results as JSON or CSV
Extending the Project (Part 2)
More Ideas for Enhancement
Advanced:
- Parallel processing for faster searches
- Interactive mode with menu selection
- Fuzzy matching for typo tolerance
- Integration with git to search only tracked files
📚 What We Covered
Skills Acquired in This Project
Python Concepts:
✅ Modern project structure with UV
✅ Command-line argument parsing with argparse
✅ File system operations with pathlib
✅ List comprehensions and generators
✅ Exception handling best practices
✅ Function design and documentation
✅ Conditional logic and control flow
Tools and Libraries:
✅ UV package manager
✅ Rich library for terminal UI
✅ pytest for unit testing
✅ Syntax highlighting and themes
Software Engineering:
✅ Code organization and modularity
✅ User experience design
✅ Error handling strategies
✅ Testing methodologies

🎯 Challenge Problems
Practice Exercises
Challenge 1: Add a Counter
Modify the program to count how many times the search term appears in each file, not just which files contain it.
Challenge 2: File Size Filter
Add options --min-size and --max-size to filter files by size (e.g., --min-size 1KB --max-size 1MB).
Challenge 3: Date Filter
Add options to search only files modified within a certain date range.
Challenge 4: Export Results
Add a --export option that saves results to a JSON file with file paths, sizes, and match counts.
Challenge 5: Interactive Mode
Create an interactive mode where users can repeatedly search without restarting the program.
Challenge 1: Solution — Add a Counter
Counting Occurrences
Modify searchFileContents() to return count information:
def searchFileContents(myPath, searchTerm, myFileType="*", full_search=False):
    """Search for files containing searchTerm in their contents."""
    base_path = Path(myPath)

    results = []  # Store (path, count) tuples
    for p in base_path.rglob(myFileType):
        if p.is_file():
            if not full_search and is_hidden(p):
                continue
            try:
                with p.open() as f:
                    content = f.read()
                    count = content.count(searchTerm)
                    if count > 0:
                        results.append((p, count))
            except Exception as e:
                console.print(f"[yellow]Warning: Error reading file {p}: {e}[/yellow]")

    return results

# Update display code to show counts:
if myFiles:
    for idx, (file_path, count) in enumerate(myFiles, 1):
        console.print(f"[bold yellow]{idx}. {file_path} (Found {count} times)[/bold yellow]")
        printFileContents(file_path)
Challenge 2: Solution — File Size Filter
Adding Size Parameters
Add to argument parser:
parser.add_argument(
    '--min-size',
    type=str,
    help='Minimum file size (e.g., 1KB, 1MB)'
)

parser.add_argument(
    '--max-size',
    type=str,
    help='Maximum file size (e.g., 10MB)'
)

# Helper function to parse size strings
def parse_size(size_str):
    """Convert size string like '1KB' to bytes."""
    units = {'B': 1, 'KB': 1024, 'MB': 1024**2, 'GB': 1024**3}
    size_str = size_str.upper()
    for unit, multiplier in units.items():
        if size_str.endswith(unit):
            return float(size_str[:-len(unit)]) * multiplier
    return float(size_str)

# Add size filtering to search functions:
if args.min_size or args.max_size:
    min_bytes = parse_size(args.min_size) if args.min_size else 0
    max_bytes = parse_size(args.max_size) if args.max_size else float('inf')
    myFiles = [f for f in myFiles
               if min_bytes <= f.stat().st_size <= max_bytes]
Challenge 3: Solution — Date Filter
Getting Started: Here is some code to study that will help you write your date filter functionality. 🎨
Important
from pathlib import Path
from datetime import datetime

# Define the file path
file_path = Path('your_report.csv')

# Get file status information
stats = file_path.stat()

# Extract and convert timestamps
modified_date = datetime.fromtimestamp(stats.st_mtime)
created_date = datetime.fromtimestamp(stats.st_ctime)

print(f"Last Modified: {modified_date.strftime('%Y-%m-%d %H:%M:%S')}")
print(f"Created: {created_date.strftime('%Y-%m-%d %H:%M:%S')}")
📖 Resources and References
Keep On Learning: If you want to learn more about the concepts and tools used in this project, here are some helpful resources! I used these to make these slides!! 🎨
Learn More
Documentation:
- UV Documentation — Package manager guide
- Rich Documentation — Terminal formatting
- argparse Tutorial — Command-line parsing
- pathlib Guide — Path operations
- pytest Documentation — Testing framework
Related Topics:
- File I/O operations in Python
- Regular expressions for pattern matching
- Command-line tool design principles
- Software testing best practices